2026-02 ~ Jane Street Puzzle ~ Subtiles 2
Puzzle Prompt
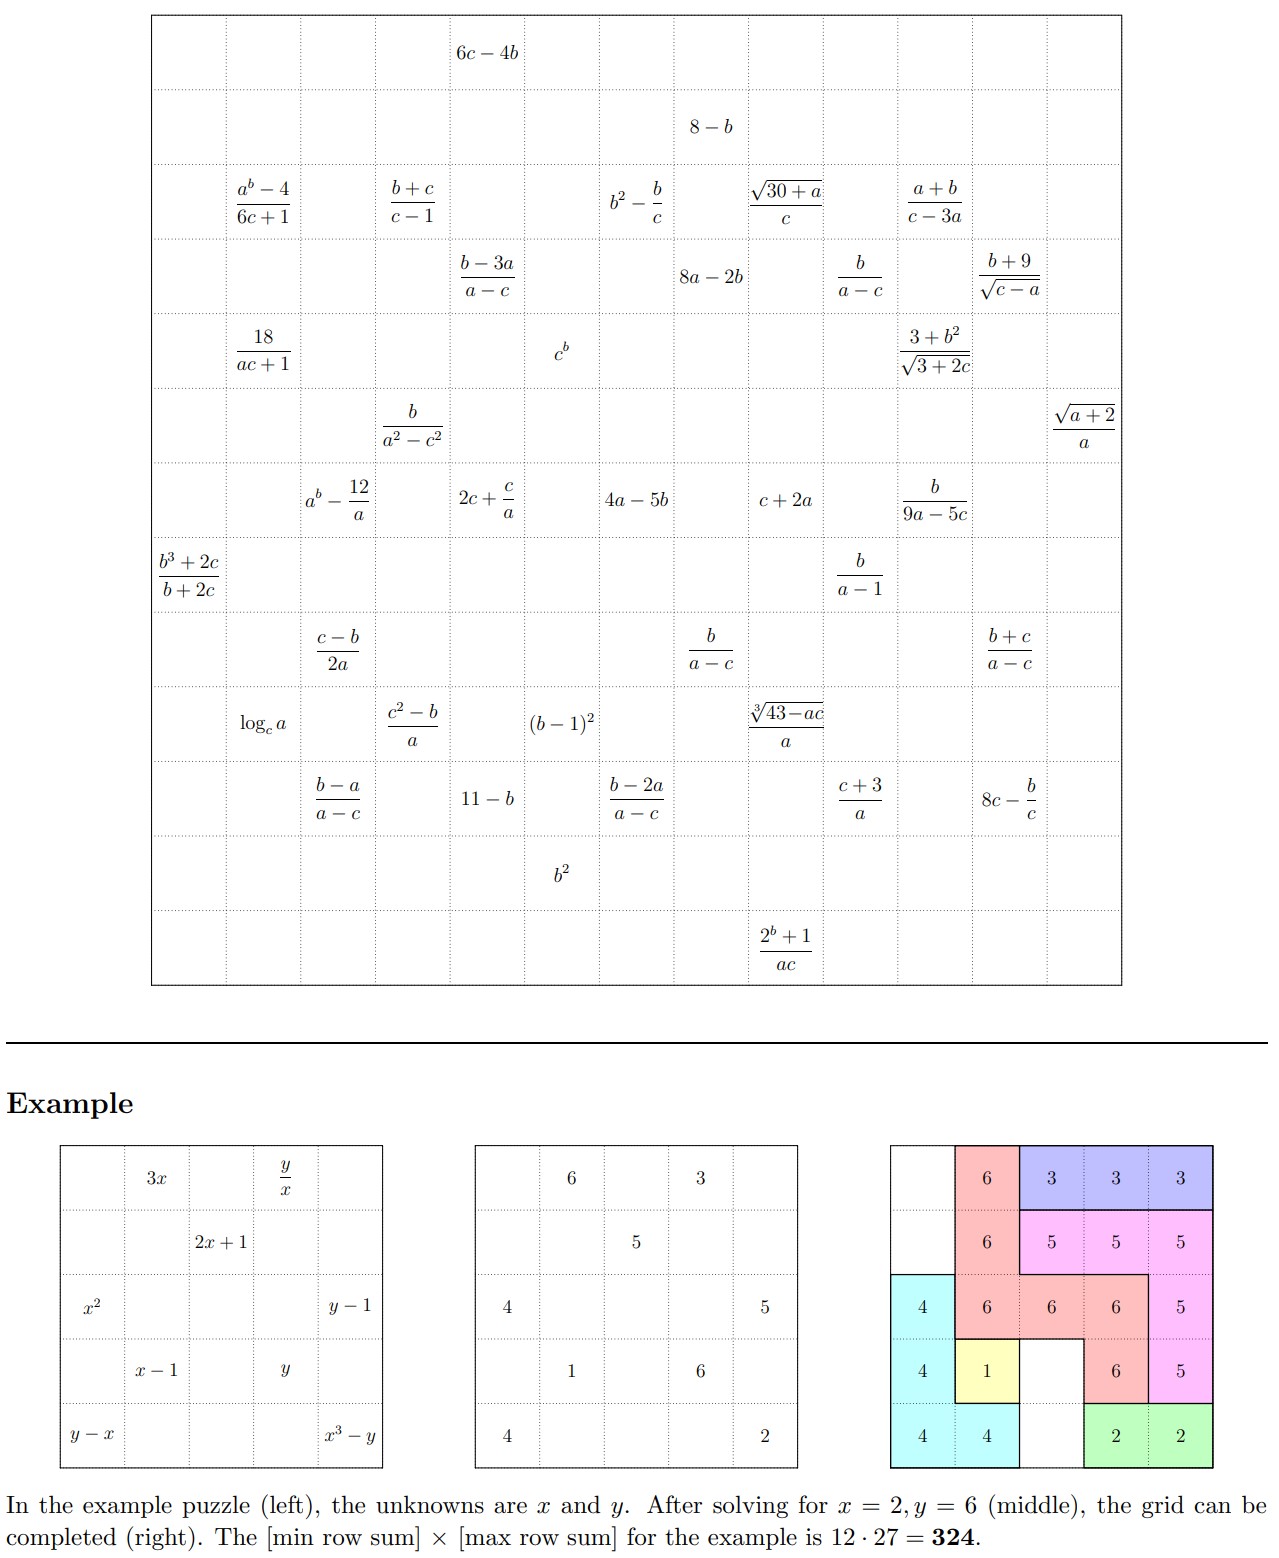
Place positive integers in some of the cells of a 13×13 grid, so that the grid contains one 1, two 2's, three 3's, and so on, up to N N's (for some N).
For any integer K in the grid, the cells labeled K must form an orthogonally connected region (a "K-omino"). Furthermore, for each K > 1, the K-omino must contain the shape formed by the (K−1)'s. Rotations and reflections are allowed.
Some of the cells have been labeled with formulas involving variables a, b, and c.
After completing the grid, compute the sum of the labeled cells in each row. The answer to this puzzle is the product of the maximum and minimum row sums.
The Grid
Interactive Visualizer
Once you've figured out the values of a, b, and c, this interactive visualizer can help you with the tiling phase. It includes a brush palette, stamp mode with shape preview, orientation cycling, and automatic containment verification. Instructions are included on the page.
My Solution
The solve breaks into two distinct phases: resolving the variables, and then tiling the grid. Both are behind spoiler tags below — expand them when you're ready.
Step 1: Finding the Variables (click to expand)
Strategy
There are 37 formulas scattered across the grid, each involving some subset of a, b, and c. Every formula must evaluate to a positive integer — that's the key constraint.
Isolating a and c
I noticed that 7 of the formulas depend only on a and c:
By brute-forcing all (a, c) pairs from −20 to 20 in steps of 0.01 and checking whether every a-c-only formula yields a positive integer, I found exactly one solution: a = 0.25, c = 0.5.
Solving for b
With a and c pinned down, I plugged them into the remaining 30 formulas and swept b from −10 to +10 (again in steps of 0.01).
This is where I initially got stuck — I'd only been searching positive values. Once I extended the range to include negatives, a unique solution emerged: b = −3.
The fact that b is negative is a bit surprising and easy to miss if you don't consider it. The brute-force approach is simple but effective here because the step size of 0.01 is fine enough to catch solutions like 0.25, −3, and 0.5, and the search space is small enough to enumerate exhaustively.
Scripts
- brute_force_ac.py — searches for valid (a, c) pairs
- brute_force_b.py — searches for valid b given a = 0.25, c = 0.5
Step 2: Tiling the Grid (click to expand)
With the variables resolved, the formulas evaluate to concrete integers, giving you a partially filled 13×13 grid. Now comes the harder part: completing the tiling so that every number from 1 to 16 forms a valid connected region, and each region contains the shape of the one below it.
Start with the most constrained number
The general strategy is to start with whichever number has the most pre-filled (formula) cells, since that leaves the fewest degrees of freedom. In this puzzle, 12 has four formula cells — the most of any number — so that's where I began.
By enumeration, there are only about 5 possible 12-omino shapes that pass through all four formula cells while remaining connected. Of those, one candidate immediately fails because it cuts off the cells needed for 6. That leaves 4 options, split into two families: two that extend leftward and two that extend rightward.
Prefer rectangular over square shapes
A useful heuristic: connected regions that are elongated and rectangular tend to be much easier to work with than chunky, square-ish blobs. Square shapes consume space in a way that makes it very hard to fit neighboring numbers around them — especially when you consider that 13, 14, 15, and 16 all need large connected regions nearby.
For this reason, I went with the rightward-extending orientation of 12, which produces a slimmer, more rectangular footprint.
Build a visualizer (seriously)
At this point I'd strongly recommend building a good interactive tool, because the shapes are irregular and you'll quickly lose track of which orientations you've tried. I built an HTML visualizer with several features:
- Paint mode: click cells to assign them to a number.
- Stamp preview: select a shape and an orientation, then hover it over the grid to preview placement before committing.
- Fixed orientations: every polyomino has at most 8 distinct orientations (4 rotations × 2 reflections). Rather than freely rotating/reflecting on the fly, I pre-generated all 8 and cycled through them one by one.
- Containment verification: after placing a number, the tool automatically checks whether the (K−1)-omino shape is properly contained within the K-omino.
The stamp tool was by far the most valuable. Without it, you're essentially trying to mentally rotate irregular polyominoes and check overlap — a recipe for errors.
Work downward from 12
With 12 placed, I moved to 11 next. The 11-omino is just the 12-omino with one cell removed, and it conveniently occupies the top-right corner of the grid in relative isolation. There are only a few valid orientations that fit, and one of them neatly fills that corner without interfering with 15 or 8.
From there, 10 follows the same logic: it's the 11-omino minus one cell, and it fills the bottom-right corner. The stamp method makes finding its orientation straightforward.
The big numbers are easier than they look
Counterintuitively, 15 and 16 are not the hardest numbers to place. Because they occupy so many cells, there's actually very little flexibility in where they can go — often just a single valid orientation once the surrounding numbers are committed. I could have (and probably should have) placed 15 and 16 right after placing 12.
The small numbers gave the most trouble
Numbers like 7 and 8 turned out to be the trickiest. I got very close to a complete solution at one point, only to find that I couldn't fit an 8-omino anywhere — which turned out to be a consequence of an earlier mistake with 11 cutting through 15 and 8. After backtracking and choosing the correct 11 orientation, the remaining numbers fell into place.
4 is also worth noting: its placement is tightly constrained by the 12-omino orientation you chose, and working it out helps confirm (or invalidate) your choice early on.
Verifying containment
A valid tiling isn't just about connectivity. The containment rule requires that for each K > 1, the (K−1)-omino shape can be found inside the K-omino (allowing rotation and reflection).
I wrote verify_chain.py to automate checking this top-down. Given a placed K-omino, it generates candidate (K−1)-shapes by removing one cell at a time, expands each into all 8 orientations, and tries every grid translation — filtering for placements that cover all formula cells and don't conflict with other numbers.
Separately, verify_answer.py does a pure geometric containment check on the final grid: for each K > 1, it normalizes both the (K−1)-omino and K-omino shapes, then checks whether any orientation of the smaller shape fits entirely within the bounds of the larger one.
Scripts
- verify_chain.py — enumerate valid (N−1)-omino placements given an N-omino layout
- verify_answer.py — verify the final grid (counts, connectivity, containment, row sums)
Final Answer (click to expand)
Variables: a = 0.25, b = −3, c = 0.5
The grid uses numbers 1 through 16 (136 cells filled, 33 boundary cells empty).
- Maximum row sum: 162
- Minimum row sum: 56
Key Takeaways
- Brute-force the variables. The search space is small enough that sweeping with step size 0.01 works. Don't forget to check negative values.
- Start tiling from the most constrained number. The number 12, with 4 formula cells, is the linchpin of the entire grid.
- Prefer elongated shapes. Rectangular orientations leave more room for neighboring numbers than square ones.
- Build good tooling. A stamp-based visualizer with pre-computed orientations and automatic containment checking saves enormous amounts of time and prevents errors.
- Watch for cascading conflicts. A bad placement for one number can make it impossible to place others several steps later. If something feels wrong, backtrack early.
- Big numbers are deceptively easy. With so many cells to fill, 15 and 16 often have only one valid orientation — resolve them as soon as you can.
Downloads
- formulas.json — all 37 formula definitions with grid coordinates
- brute_force_ac.py — brute-force search for a and c
- brute_force_b.py — brute-force search for b
- verify_chain.py — containment chain verification
- verify_answer.py — final grid verification